Showing posts with label weathering. Show all posts

Tuesday, 3 May 2022

Impressionist Scenery...


Well, it's been about two years since my last post on this blog, so going on my performance over the last ten years or so, it must be time for a new post!

As I mentioned at the end of my last post, I was, at the time, about to retire from the editorship of AMRM. Hard to believe that was nearly two years ago... being retired is great!

In that time I have been steadily working away on Lambing Flat and it is now 'complete' (though far from finished), just in time for it to be dismantled and moved to a new location! In early 2021 I purchased a very pleasant 'retirement' home in Cowra, NSW, (yes, Lambing Flat is going (almost) 'home'!) and after many delays, mainly caused by the various Covid lockdowns and the severe shortage of tradies, I am finally ready to move in. The date has been set and by the 1st August, I, Lambing Flat and Leo the Blunderdog should be happily setting up in our new home.

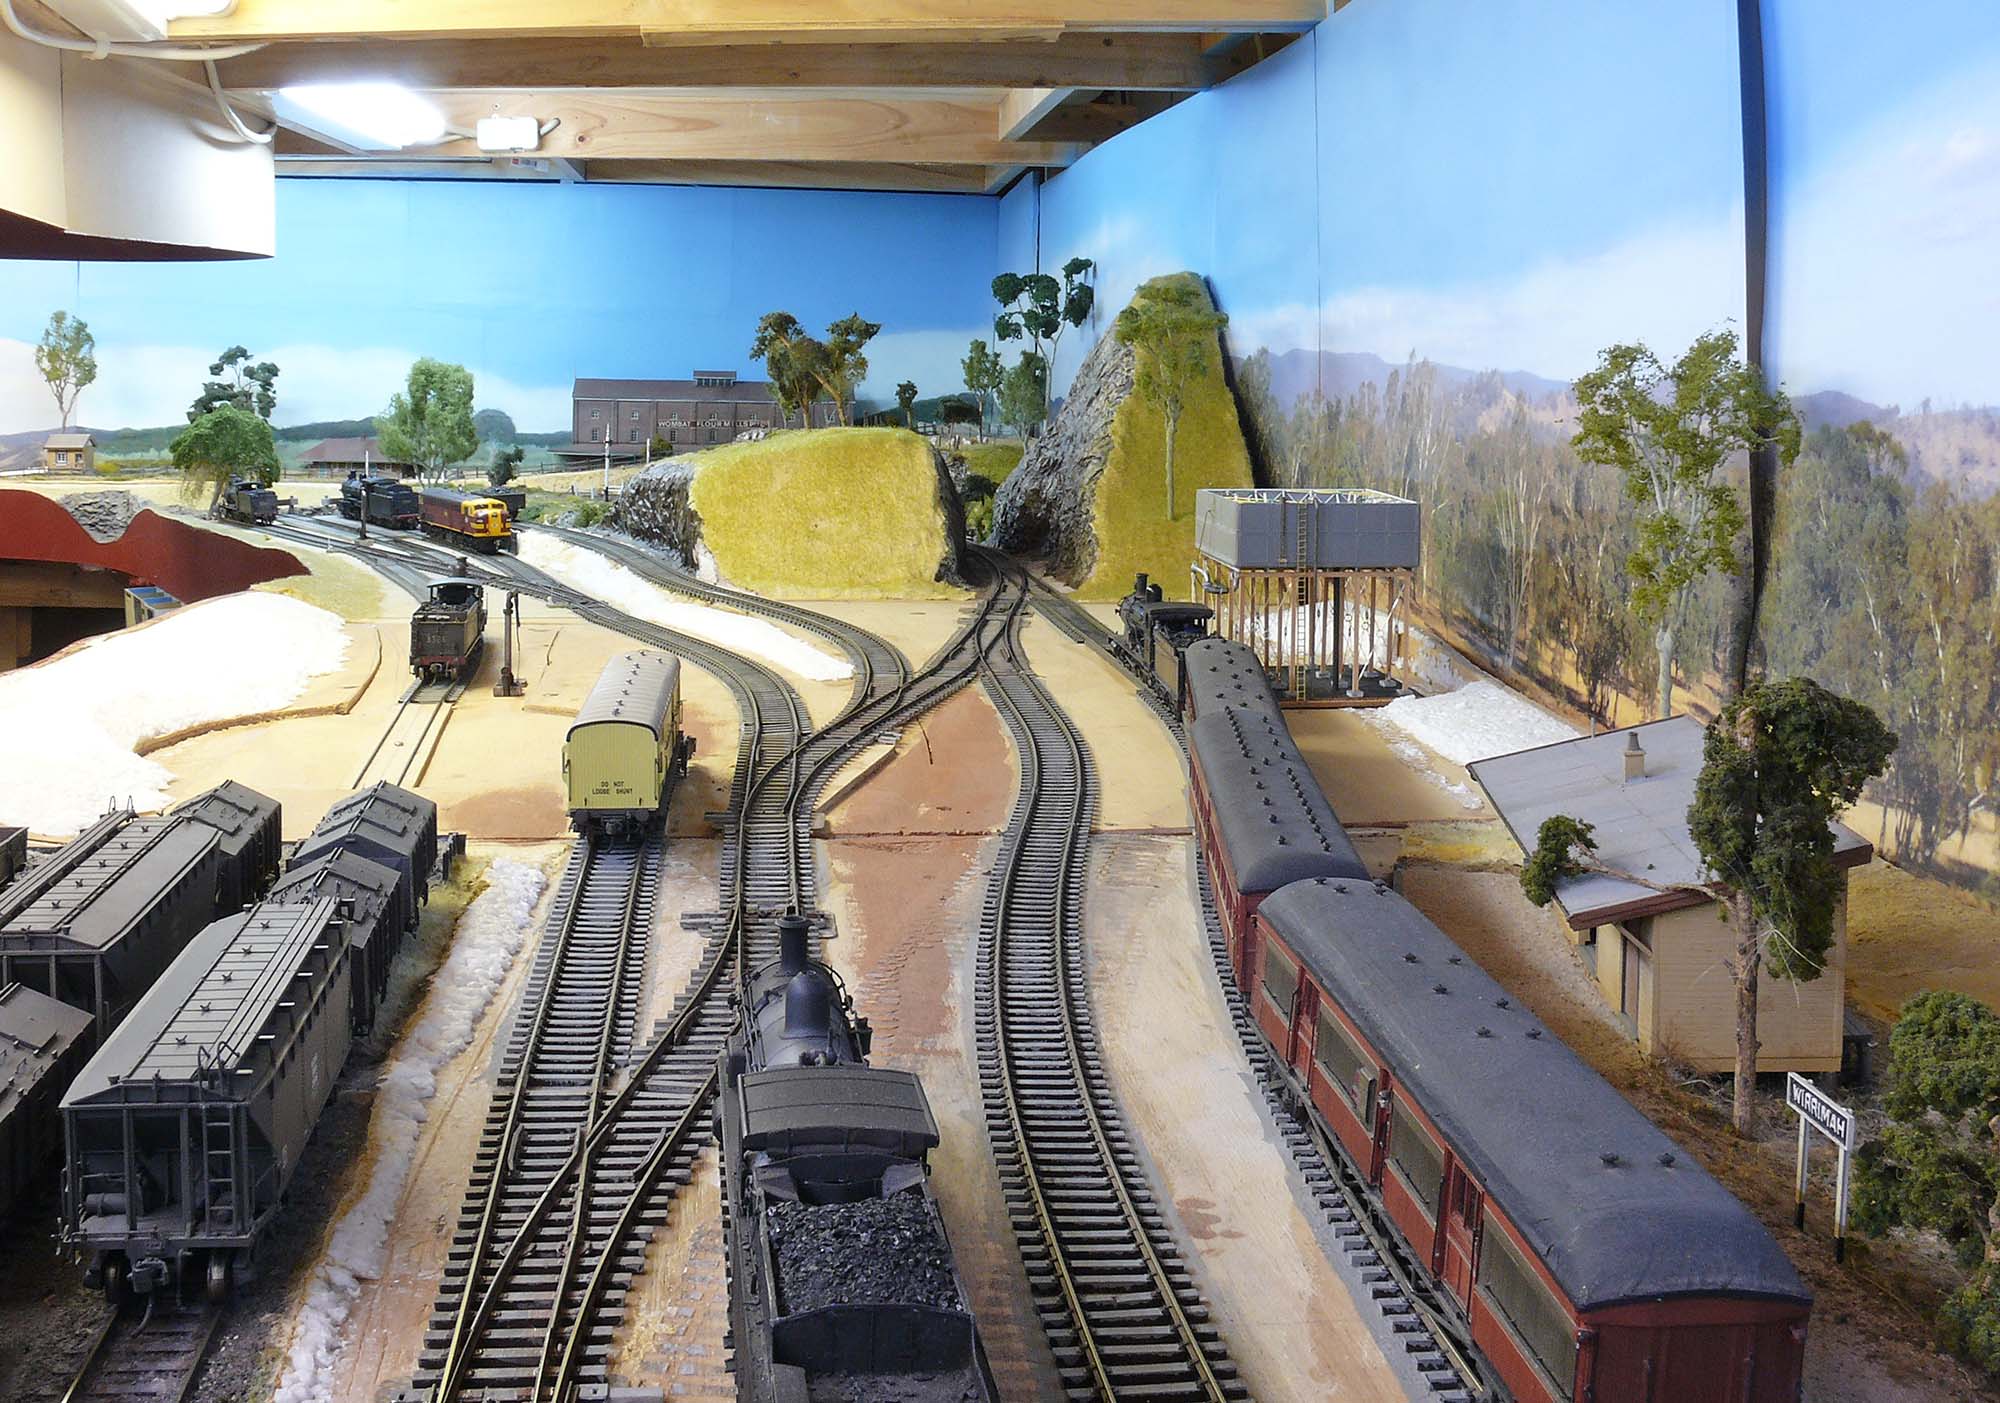
Now, with the preliminaries out of the way, we come for the reason (excuse!) for this post. While I have expanded the layout and completed most of the scenery, there were a couple of areas that had not progressed beyond the track and carved foam stage of scenery construction. With the move rapidly approaching and my realisation that those particular sections would not fit in the new space, there was no point to finishing them, but the bare foam was very jarring and detracted from the 'look' of the rest of the layout. What to do... then came the 'lightbulb' moment... I remembered Marcus Ammann's rather clever use of 'impressionistic' scenery on some parts of his very extensive layout and how effective it was. So I thought, why not just use my acrylic artist's paints (used for the 2D backscenes) to quickly apply some colour to the 3D sections as well! I splashed a bit of paint around one Sunday afternoon and the results can be seen in the accompanying photos (and the header photo). It may not be as detailed as finished scenery, but it doesn't ruin the illusion as much as unfinished scenery does. 


One of the sections that were unfinished, linking the mill scene and the stockyard end of Lambing Flat station, across the short end of the garage. The header photo shows the same scene after painting.

This is the unfinished section between the mill scene and Bulla Creek yard in 2020. I was not happy with the track arrangements and it won't fit in the new space anyway.


The same view, taken about an hour ago. Since the first photo was taken, the hill to the right of the main line has been reduced in height and the section of hill between the main line and the loco depot has been removed. The water tank has also been finished (more on that below). Once more, while not as good looking as finished scenery, it gives an impression of scenery and blends in far better than it did in the earlier view.


Another view of the 'impressionist' section with some 'real' scenery behind along Back Creek.

I've come to the conclusion that this is a very quick and effective method of 'filling in the gaps' of an incomplete layout and will be doing this to unfinished sections in future until I can schedule the time to apply more detailed scenery.


As mentioned above, the NSWGR water tank I was building in the previous post has now been completed. Here are some images of it.

By 16th May 2020, the water tank looked like this. The base colour is an airbrushed coat of Tamiya XF-24 Dark Grey. The concrete footings and the drain were hand painted with Top Coat 'Concrete' colour, while the ends of the water crane were picked out with black and the silver section hand-painted Tamiya XF-16 Flat Aluminium. Weathering consisted of various 'washes' of very dilute in isocol alcohol Tamiya XF-10 Flat Brown, XF-52 Flat Earth and black. The plywood base was painted an earth brown and then a light covering of my 'earth' and 'ash' dirt mix, plus a bit of green scatter material, glued on as per my normal scenery making method. Then I had to gradually pour layers of Woodland Scenics Realistic Water to represent the water. What a saga that turned out to be...


Ten months after the previous photo the water pour had finally been completed! I first spent a month carefully pouring layer after layer of Woodlands Scenic Realistic Water, but I wasn't completely happy with the final result. The Realistic Water was easy to pour (just time consuming as one can only pour a couple of millimetres at a time, wait a day for it to dry then pour another couple of mm), but, in this circumstance, it manifested a terrible meniscus that was quite unsightly. By the end of June 2020 I has reached the top of the tank, but the water wasn't level at all, with that unsightly meniscus showing everywhere the 'water' came into contact with anything. I tried painting the 'humps' a greenish hue to disguise it as algae, which did alleviate the problem a little. As mentioned earlier, I wasn't happy with it, but I couldn't think of any way to improve it, so I just placed it on the layout and got on with other things.
After a couple of months of not going out to the layout room for various reasons, I came back to find that the water had shrunk about 7-8mm below the original surface and looked even worse!
At first I experimented with adding layers of Feast Watson Decking Oil obtained from Bunnings (I had used all the Realistic Water I had, plus I wasn't happy with the result from using it anyway). This worked for a couple of layers, giving a nice dirty water effect, but then the surface started to 'wrinkle', long before I reached the needed 'top' of the water.
Ah well, looks like I'd have to get some more Realistic Water and just put up with the substandard result... However, a trip to MRRC at Blacktown revealed that they had sold out of Realistic Water and weren't going to be able to get any more any time soon (the supply chain had been completely disrupted by the COVID epidemic). They did have some Woodlands Scenic Deep Pour Water however, so I decided to give it a go.
I wish I had used this stuff to start with! It is very easy to use, can pour much thicker layers and has a much smaller and less obtrusive meniscus. I'm now very happy with the look of the 'water' and the tank has been on the layout ever since. Now, my only frustration is that all that intricate interior detail I spent so much time putting in the tank is all but invisible under the water!

Another shot of the completed tank.


That's it for this post; see you in two years!


Tuesday, 22 August 2017

Some of the new 'intrastate' stuff, Pt 1...

The constant deluge of r-t-r rolling stock does make it very easy to fill up the yards with lovely models of the delightfully picturesque wagons that kept the intrastate traffic moving back in the steam/early diesel era in which Lambing Flat is set and quite a few have joined the roster since my last post on the subject some years ago. However, as long term readers will be aware, I don't like things 'straight out of the box'. Before a model will be accepted by the Traffic Officer, Lambing Flat, it has to be weathered, at least! And, while the vast majority of Lambing Flat's new stock is r-t-r, I do occasionally assemble the odd kit or two!

Below are images and brief descriptions of some of the intrastate (ie non-bogie exchange) NSWGR stock that has joined the roster recently.


As with any NSWGR layout set in the wheat growing areas of the state, lots of wheat wagons are essential. I have plenty of four-wheel RU hoppers, courtesy of the old Trax kit and the original Trainorama r-t-r version, but the more modern wheat hoppers have been neglected. A trio of Austrains WHX hoppers were acquired, two as originally delivered and one of the 'Manildra' signwritten models. On the two original condition ones, I replaced the Austrains bogies with the correct type for my period, the 2CE bogies from On Track (and the wheels, as the wheels that come with the On Track bogies are too big). I also altered the wagon number on one of them, as I had somehow managed to acquire two vehicles numbered WHX30756! They were lightly weathered to represent vehicles that have only been in service a short time, as this batch of WHX were delivered in 1971/1973, so fall towards the end of my preferred time period. First I painted the wheels and bogies black, painted the wheel faces Tamiya XF-10 Flat Brown and then 'washed' the bogies with the Flat Brown and Aqueous Hobby Color H343 Soot, I painted the brake hoses and Kadee 'tangs' flat black, then I lightly sprayed the body of the vehicle with a very dilute mix of Isocol alcohol and Tamiya XF-52 Flat Earth. Another light coat of Isocol alcohol and Soot tied it all together. Being very 'modern' wagons by Lambing Flat standards, if they are included in a train, the train is more likely than not to be diesel-hauled!


Up until the release of the Trainorama r-t-r BWH hoppers, there was only one BWH on the layout, an AR Kits kit-built and superdetailed model that I completed in the mid-1980s. A trio of Traino r-t-r BWH hoppers were acquired and weathered back when they came out and, more recently, this Powerline version has also joined the fleet. It is straight out of the box and weathered with my usual acrylic paint technique. I really should have changed the handrails on the foot walk to the correct shape, but I'm not going to live forever... It 'disappears' amongst the considerable number of vehicles that now populate the layout, so, I'm not going to mention it if you don't...


No NSWGR post-war layout would be complete without plenty of these little beauties, the ubiquitous S truck. This is just one of the fifteen Austrains/SDS 'ultimate' S trucks that have joined the many, many kit-built versions of this essential wagon on the layout. This one is from the first Austrains batch, which came painted in a very deep black, so I have weathered it to represent the condition of them when they were relatively new, with a worn interior, but a lightly weathered exterior. In the background is, from the left, an Austrains GSV modified to post-war condition, as per Ian Dunn's article, 'Modernise Your GSV', in AMRM Issue 298 (February 2013), an Austrains '1921' CW and a highly modified Camco '1947' CW kit. Next is the end of an MBC, converted from a very old Rails North epoxy MRC kit.


Here are a few more weathered S trucks from the first 'black' Austrains batch, along with a weathered Austrains CW.


This photo shows a better view of the interiors of two of the S trucks, plus a weathered Austrains SRC refrigerated van and lots of stock wagons from a variety of sources.


 And here are a few more, standing in front of some weathered SDS rail tank cars. The COR tank is heavily weathered, but the Golden Fleece version is relatively clean. Believe it or not, the photos of Golden Fleece RTCs I have seen that were taken in the 1960s show them quite clean and bright.


The second batch of Austrains S trucks came with a much greyer paint finish, so that has been utilised to represent S trucks that have been in service longer than those represented by the weathering done on the first batch. Also shown here is a Trainorama K wagon which was weathered at the same time, using my usual acrylic paint technique. Surrounding the newly weathered vehicles are some of the many open wagons on the layout, including r-t-r Traino steel S trucks, kit-built ILM D and BD, plus Trax/Casula S and K wagons and a very old Bergs K wagon (with Dreadnought ends).


Another Austrains S from the second batch, along with a Eureka RSH and Traino K wagon, with Austrains PV explosives van and MV louvred van, all weathered with my acrylic paint and Isocol alcohol method.


An Austrains '1921' CW, plus two Eureka LCH and a CCH four-wheel hopper wagons, stand in front of a rake of stock wagons, including an Austrains '1915' CW and a Silvermaz '1948' CW, heavily modified and backdated to their appearance on delivery, before the extra vertical strengthening timbers were added to the sides.


I'll finish off tonight's post with a couple of stock wagons, starting with this SDS BCW. This has had a canvas (stretched tissue) roof covering added, but otherwise is 'straight out of the box'. It is is pretty good condition, just a little grubby, which is appropriate for Lambing Flat's time period, as these vehicles were introduced in 1959, so were quite new at the time the layout represents. Weathered with my usual 'misted' acrylic techniques.


There are two '1959' BCW bogie cattle wagons on the layout, the modern SDS version shown above and this old Protype kit, constructed back in the early 1980s. Not knowing any better at the time, I had constructed it with a double roof, as per the four-wheelers. I recently took the double roof off and fitted a new canvas covered single roof, as it should be. The new roof was painted and weathered and the body reweathered to blend it all together. Not up to the standard of the SDS version, but not bad for a model for which the masters were constructed in the late 1960s...


A definite relict of the past, an Austrains '1915' CW. While most of these were 'converted' to the '1921' CW specifications during the 1930s and 1940s, at least two soldiered on until 1965/'66! (I've seen them in a video taken at Nyngan.) Weathered with the usual acrylics method.


Last, but not least, is the last of my Austrains GSV sheep wagons to be weathered. It had taken so long (the rest were finished years ago) because I didn't have a replacement GSV roof for this one (they were mistakenly fitted with CW roofs at the factory). I obtained replacement roofs from Austrains for the rest of them, but not for this one, for some reason lost in the depths of time! So, I finally got around to scratchbuilding a new roof (and modifying the model to represent the post-WW2 appearance of the '1927' GSVs, as per Ian Dunn's article 'Modernise your GSV' in AMRM Issue 298 (February 2013). It's late completion also means that it is the only loaded sheep van on the layout, as it has been fitted with some of Ray Pilgrim's 3D printed sheep. The roof was completed very conventionally with strips of timber and styrene, with corrugated aluminium for the roof itself. Weathering was by my standard Acrylic paint method, with a combination of washes and drybrushing to get the base elements, with the whole thing then airbrushed with light coats of 'misted' colour to tie it all together.

There are still quite a few to describe, but that will have to be in a future post...


Wednesday, 16 August 2017

That damned 'Pig'!


When I last mentioned 3607, my modified Austrains roundtop 'Pig' back in November 2014, all was not well, a situation that persisted for some time. It had reached the basic painting stage, as shown below:


But try as I might, I could not get the damned thing to run smoothly. It had a bind in the mechanism that I just could not find, despite completely dismantling it a couple of time and checking it very carefully and even resetting and twiddling with the CVs on the Tsunami chip. Becoming quite discouraged I consigned it to the back of the display cupboard and got on with other projects. About six months later I returned to it and spent a couple of fruitless weeks fiddling with it, all without much success (as it turned out the problems were multiple, see below), but it did make it onto the layout for extended testing and a record shot.


I could get it to run reasonably well on the workbench on DC, but put it on the layout and it ran like a demented duck with five broken wings... I even consulted the experts (thanks Marcus!), but all to no avail. 

By October 2015, a little progress had been made after a few more complete dismantling and reassemblies and it was starting to run 'sort of OK' occasionally, so I resolved to finish off the weathering and at least finish it off cosmetically. I wanted to create a fairly clean locomotive, as per this John Stormont photo of 3607 at Cootamundra in 1954, originally printed in the January 1990 edition of the RTM's 'Round House' magazine.


This photo from mid-October 2015 shows progress at that date. I used a variety of washes of gloss blacks and some sprayed Tamiya X-19 Smoke to achieve the 'freshly blackoiled' look, but as this photo shows I still had a little detail work to do to blend all the weathering together, plus fit cabside numbers, headlight and window glass, Eveleigh builder's plate and employ a crew.


A few days later and she was visually complete, representing a clean locomotive that had at least one trip under her belt. But it still wouldn't run satisfactorily!


Fast forward to April 2017 and nothing had changed, she looked nice, but was very unreliable, running very jerkily and not being a very useful engine at all, other than as a photographic prop!


Then, a chance comment on my Facebook page set me off in another direction! At last, breakthrough! After investigating, I came to the conclusion that one of the driving wheelsets was 'out of quarter' and, after swapping over the two leading wheelsets with the driving wheels in my 'spare' 36 class, I got it to run smoothly... on the workbench!

However, once placed on the layout, it was still very unreliable, despite extra pick-ups on the tender and a 'stay-alive' chip. Another month or two passed with not much change, it would run smoothly when it chose to run, but that was not often! It was very obviously a pick-up problem, but, considering the number of extra pick-ups I had added, this should not be occurring. Perhaps the standard Austrains brass tender wheels, despite much cleaning, were the problem, so I decided to replace them with some spare nickel-silver On Track wheels sets I had on hand from the original run LLV louvred vans. Being the same axle lengths and wheel diameters, they just dropped straight in and nickel-silver is reputedly a far better conductor of electricity than is brass. That part of the exercise successfully completed, I checked them for electrical continuity with my multi-meter. The electrical continuity of one side of the tender wheels was perfect, but, on the other side, nothing! On removing the bogies and checking the joint between the wire to the chip and the wipers (hidden out of sight on top of the bogie and only visible once the bogies had been removed, something it had not occurred to me to do previously!) I discovered that the connections to both bogies had broken off! No wonder the b^%$#y thing wouldn't run! A quick resolder and back on the track and perfection, it now runs like a dream! After three years of frustration, I finally have a reliable, smooth running roundtop Pig!


The District Locomotive Superintendent is now 'over the moon', as he, at last, has a locomotive that is reliable as well as pretty to help move the traffic! 

Here she is, standing in No.1 road at New Yard with a goods train, waiting for permission to depart, alongside Cowra stalwart, 5597. (The story of how 5597, a real 'Franken55', plus the scenery on 
New Yard, came to be, will be the subjects of future posts).